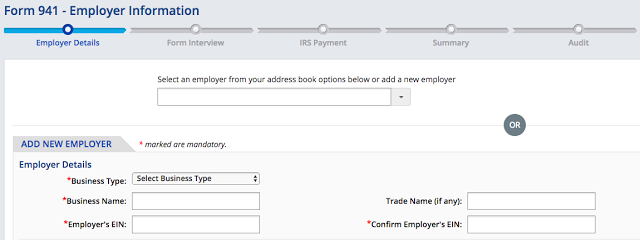
| In addition to the details shown, you’ll also provide the employer address, contact details, signing authority, and aggregate filing information.
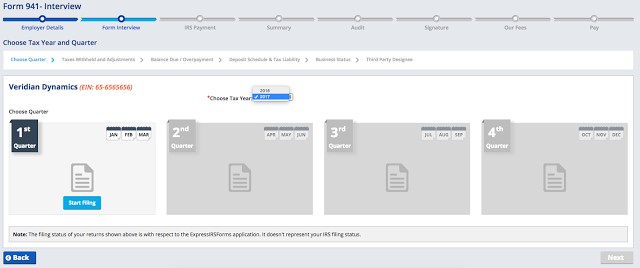
Now, it’s time to choose a tax year and filing quarter:
As you can see, you can choose between the current tax year or the most recent previous one (in this case, 2017 and 2016, respectively). So select a year from that drop down box, then click the Start Filing button in the box that corresponds with the quarter for which you need to file a 941 Form.
Next, you’ll fill in a series of boxes and answer questions to provide your wage and tax information for the quarter. Don’t worry: in these sections, ExpressTaxFilings won’t let you keep moving forward if you’ve entered something in the wrong box. You may even find that our streamlined process is more simple and straightforward than filling out those paper forms.
You’ll also answer some questions on your tax deposit schedule and indicate whether your business closed, you stopped paying wages, you sold your business, or you’re a seasonal employer who doesn’t need to file for every quarter on the subsequent pages. If you have a third-party designee you’d like the IRS to discuss this form with, you can also include their contact information before completing the process.
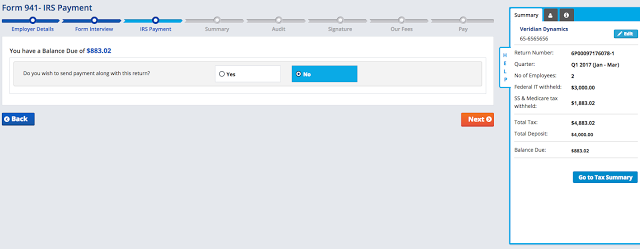
Now that you’ve entered in your info to complete your 941 Form, you’ll have the option to pay any taxes currently due to the IRS before your deadline:
You’ll probably notice, too, there’s a summary of the information you’ve entered so far to the right of your screen. You can click the Edit button in this section to go back and make any changes or click the Go to Tax Summary button to view more details about your 941 Form taxes.
Before you go on to sign your Form 941, you’ll be able to review your information and your data will be sent through a quick review to ensure any obvious errors are taken care of:
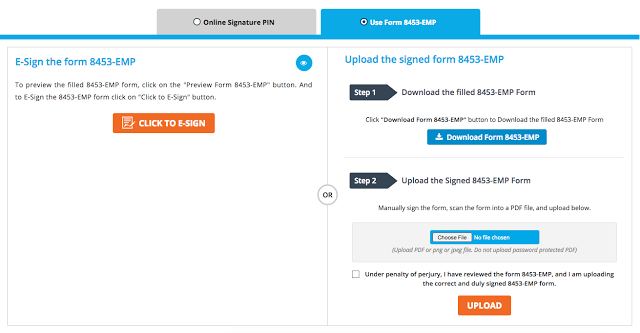
Next is that signature part we talked about before:
If you already have an Online Signature PIN, make sure you select that tab. From this tab, you can also request a Signature PIN if you’d like, just keep in mind that the process to receive this PIN and have it activated takes about 45 days. In the meantime, after you’ve requested a PIN, you can use Form 8453-EMP to sign your Form 941 by selecting that Use Form 8453-EMP on this page.
Here, you can either literally sign online using your mouse by clicking the Click to E-Sign button, or you can manually download, print, sign, scan, and re-upload an actual Form 8453-EMP to submit your Form 941. If you choose the Click to E-Sign option, you’ll have the chance to view your Form 8453-EMP (complete with signature) once you’ve finished signing:
Once that’s signed, all that’s left to do is take care of your one-time transmittal fee! From the first payment screen, you can choose whether you’d like to pay for just this one quarter or if you’d like to prepay for a year’s worth of quarters at a 10% discount. You’ll enter your credit card details, review everything one more time, then bing-bang-boom, it’s time to hit that big, green Transmit button and send your Form 941 securely to the IRS!
Once your Form 941 has been accepted by the IRS, you’ll be able to download and print PDF copies from your Print Center for your records. But don’t worry, we’ll alert you by email when all that happens.
So there you have it! It’s all pretty easy when it comes down to it, but if you have any questions at all about Form 941 and the e-filing process, please don’t hesitate to give us a call! We’re here and able to take your questions by phone, live chat, and email so your Form 941 e-filing process can be as easy and stress-free as possible.
|


Leave a Comment